In continuation of our DevOps blog series, we will explore how HashiCorp Vault SSH CA Dynamic Secrets Engine can be set up to manage developer access to instances.
We will walk you through how to set up the SSH CA Secrets Engine. We also provide fine-grained secure access to your team with two EC2 instances - development and production.
The Vault SSH secrets management provides secure authentication and authorization for access to machines via the SSH protocol. The Vault SSH secrets engine helps manage access to machine infrastructure, providing several ways to issue SSH credentials.
The Vault SSH secrets management supports the following modes.
- Signed SSH Certificates
- One-time SSH Passwords
Problems
Managing SSH keys for hundreds of servers and users can prove to be an overwhelming task for the infrastructure operations team. Server access management is maintained with SSH keys across VMs that are up to date for each user. Managing these keys is even more difficult because certain users should not have access to certain VMs. To make matters worse, access must be revoked as soon as a user leaves. These problems can all lead to error-prone processes and are handled either manually, via bash scripts, config management, or through some other solution.
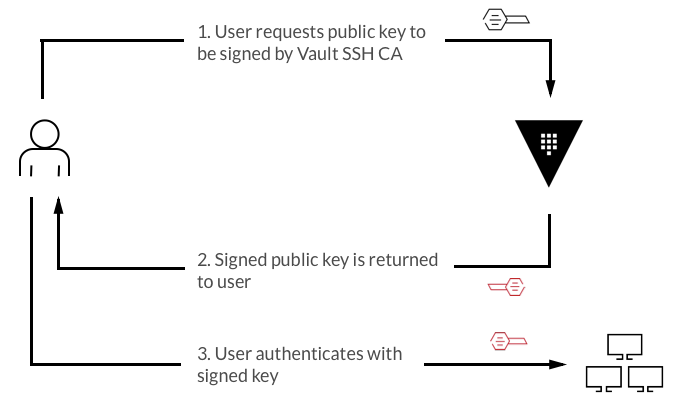
Imagine a Developer starts working in your company. We would like to give them access to a subset of machines based on their role. At the same time, we wouldn't want them to worry about managing the associated (long-lived) SSH key for the duration of their project involvement. Instead of managing a unique private key for each individual developer, we can set up Vault as an SSH CA. These create signed certificates for the contractors to SSH to target hosts. This simplifies the server access management of trusted certificates on hosts down to one SSH CA public key per role (contractors in this case) on a target host instead of an SSH key per user. See the below figure for more understanding.
Vault’s dynamic SSH keys can also be short-lived. This feature is built into OpenSSH and allows us to keep access windows to resources time-boxed. So instead of managing indefinitely lived SSH keys, we can just give out SSH keys that are good for say an hour (or less!). If users want to re-login to a destination box after key expiration, they must first re-authenticate to vault and request the generation of a new key for SSH (which the Vault audits).
How it works?
SSH leverages asymmetric public key cryptography to authenticate clients to hosts and vice-versa.
We can set up Vault to act as the Certificate Authority (CA) for our SSH certificates. In the case of client signing, we can distribute the CA public key to hosts once configured. We want users to be able to SSH into. That public key is added as a trusted user key in the destination box’s sshd configuration. Once users log in, sshd will verify access by checking the user's key signatures against the trusted CA key.
We can take things a step further by creating multiple “roles” in Vault for restricting access to subsets of machines. For example, we may set up a web prod role and a development prod role. Each role has a separate CA public and private key. We then distribute the public keys to the proper destination machines. This greatly simplifies key management as we only need to manage the CA key instead of individual keys for every user.
In this scenario, we are going to set up Vault to sign SSH keys using an internal Certificate Authority (CA). We will configure the SSH secrets engine and create a CA within the vault. We will then configure an SSH server to trust the CA key we just created. Finally, we will attempt to SSH using a private key, and a public key signed by Vault SSH CA.
Prerequisites
This guide assumes a fixed setup as given below:- A Vault Server
- Two EC2 instances with Port 22 opened in the security group.
- An SSH client machine for authentication.
- Install Vault CLI on the client server
- The client system must be able to reach the Vault server and the OpenSSH server.
- The Vault user should have the capability to enable secrets and write policies to the Vault server.
Step 1: Export VAULT_ADDR in the client system.
This will be your vault address.
You can add the following to ~/.bashrc or ~/.bashprofile if you are using a macOS to make it persistent.
export VAULT_ADDR=”http://vault_server:8200”
Step 2: Define User Policy
Create a file with your preferred text editor
vim ssh-signed-cert-user-policy.hclAdd the following to ssh-signed-cert-user-policy.hcl and save the file.
path "ssh/sign/*" {
capabilities = [ "create", "read", "update", "list" ]
}
Run the following command to write the policy to the vault.vault policy write ssh-signed-cert-user-policy ssh-signed-cert-user-policy.hcl
Step 3: Enable and configure the SSH CA secrets engine:
Enable the SSH secrets engine and mount it in an arbitrary path. This path will be used to sign Client SSH keys.vault secrets enable sshGenerate new keys in that path. You can also import keys from your existing PKI, or a Vault PKI engine.
vault write ssh/config/ca generate_signing_key=true
Step 4: Add the public key to the TARGET_HOST’s SSH Configuration.
curl -s http://vault_server:8200/v1/ssh/config/ca --header "X-Vault-Token: <YOUR_VAULT_TOKEN>" | jq -r '.data.public_key' | sudo tee /etc/ssh/trusted-user-ca-keys.pem
Step 5: Add the path where the public key contents are stored to the SSH configuration file as the TrustedUserCAKeys option.
echo "TrustedUserCAKeys /etc/ssh/trusted-user-ca-keys.pem" | sudo tee -a /etc/ssh/sshd_configRestart sshd service
sudo systemctl restart ssh
Step 6: Create a role in vault for signing client keys
Create a JSON file with required parameterscat >> certsigner-role.json <<EOF
{
"allow_user_certificates": true,
"allowed_users": "*",
"default_extensions": [
{
"permit-pty": ""
}
],
"key_type": "ca",
"default_user": "ubuntu",
"ttl": "30m0s",
}
EOF
Write the role to vault with the created JSON filevault write ssh/roles/clientrole @certsigner-role.json
Step 7: Client Authentication
Generate an SSH Keyssh-keygen -t rsa -N "" -C "Vault" -f ~/.ssh/client_rsa_keyAsk Vault to Sign your key
vault write ssh/sign/clientrole \ public_key=@$HOME/.ssh/client_rsa_key.pubSave the resulting signed public key to your local disk
vault write -field=signed_key ssh/sign/clientrole \ public_key=@$HOME/.ssh/client_rsa_key.pub > signed-cert.pub(Optional) View enabled extensions, principals, and metadata of the signed key.
ssh-keygen -Lf signed-cert.pubSSH to the Host Machine
ssh -i signed-cert.pub -i ~/.ssh/vault_rsa ubuntu@<TARGET_HOST_IP_ADDRESS>
Next Steps
Vault is a great secrets management engine with deep integration to a lot of tools including your cloud accounts. We will cover more of these use cases in the near future.
We would love your feedback and hear more about how you have improved developer productivity. If this is something you want to adopt in your environment, hit us up on devops@pace-blog.pacewisdom.in


